Pages

\

Friday, January 29, 2010

Friday Night Dinner

BEEF...it's what's for dinner tonight! GREEK STYLE!

Greek Feta Burgers
Enough ground beef for 4 burgers (assuming you are making 4) I made mine super hefty : )
About 1/4 cup finely diced onion...I like red because it's pretty
1/2 cup Feta cheese
Salt
Pepper
Worcestershire Sauce (Can anyone actually spell that word???)
1 egg

Burger Mixing Tips:
  • Don't overwork them, it makes them tough.
  • Adding a little onion makes them super juicy!
  • Egg binds 'em together.
  • Shape your burgers a little bigger than you actually want them to be because they shrink up on the grill.
  • Also, make them thinner in the middle than on the edges so they will be an even thickness when they are cooked.

These puppies are ready for the grill!


Some toppings...lettuce, tomato, pickles and Caesar Feta Spread:
3/4 cup Mayo
1/4 cup Caesar dressing
1/4 cup Feta cheese
2 tbsp. onion
Pepper
Mix it, spread it...YUM! This is awesome on anything...a burger, crackers, chips, your finger.


Zebra Cheesecake Pudding

1 sleeve graham crackers
1 stick butter (yes it's healthy....saturated fats ARE a food group, didn't you know?)
2 blocks cream cheese
1 cup milk
1 box instant vanilla pudding
1 box instant chocolate pudding
4 tbsp. powdered sugar

Mix the vanilla pudding with 1/2 cup milk, 1 block cream cheese, and 2 tbsp. powdered sugar. Do the same for the chocolate pudding. Crunch your graham crackers up really fine. If you have a food processor, it would be great for this, if not (like me), a plastic bag works fine. Melt butter and add to crackers. Mush the cracker mixture into a pan. Mush is definately a word.

Alternate adding vanilla and chocolate mixture on top (see pic). Lick the spoon for a taste of heaven. Use a knife to swirl vanilla and chocolate. You can drizzle with chocolate syrup if you would like...duhhh, of course, ALWAYS add more chocolate!

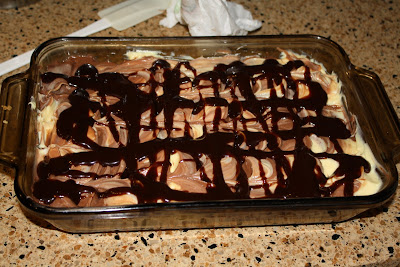
Yes, I left the napkin in the background. There were so many around the kitchen, I just didn't notice.

Refrigerate until you are ready to serve, or until you can resist it no longer!

Do other people really love food as much as we do???

Happy rest of the weekend!
Ramsey
Linked to:


Monday, January 25, 2010

Cheeseburger Casserole

I LOVE burgers...any way, shape, or form...so this recipe was an awesome new addition to my box! Another reason why it's so great is that it only has four ingredients!
Ground Beef
1 can Cream of Mushroom Soup
1 can Cheddar Cheese Soup
Frozen Fries (Thats right! Fries! See why I love this!)
Brown the ground beef in a large pan. Drain, add soups and season with salt and pepper. Spread in a baking dish and cover with frozen fries. Season the fries and pop it in the oven at 375 until the fries turn crispy. MMMMM!!!!! Serve with your typical burger toppings...ketchup, mustard, tomato, lettuce, pickles, onion. Just as yummy as the real thing!
Enjoy Everyone!
Ramsey
Linking to:

Sunday, January 24, 2010

Picnic at the Lake

The weather was amazing yesterday, so we decided to take Brody on his first trip to Lake Ella park for a picnic. (It was also a really good excuse to practice with my new camera)

Here are the boys


The sky was beautiful!


My little sweetie is a little ADD...people-watcher extraodinaire! He wouldn't let me get a good pic.


It took me forever to teach Dusty to do his hand like this.

Anywho...just a little excerpt from my weekend...hope you all enjoyed yours too!!!
Love 'till next time!
Ramsey (and Dusty and Brody) ♥

Monday, January 18, 2010

Ruffle Booty Onesie Take 2

I posted a tutorial for a cute ruffle-bootie onesie last week here, but since then I have created version #2 to share with you. Can you tell that I'm a ruffle addict???
You will need 2 strips of fabric that are twice as long as your onesie and twice as wide as you want your ruffles to be. Fold down the ends twice and iron. Fold the strips in half with the inside facing outward and iron. See picture for what this should look like.

Sew a seam down the length of the strip as shown.

Turn the strip inside out and iron. Yup, you'll be using the old iron alot for this one.

Sew a basting stitch (instructions here) down the length of the strip along the top.

Pull the thread to create a ruffle and tie it off to the length you need it to be for the onesie. Pin the ruffle onto the onesie upside down and sew in place. Iron the ruffle down and sew along the top of ruffle. See the bottom ruffle in the next picture.


Repeat for the second ruffle.


Here's what it looks like when you're done.


I added a cute little applique to the front using transfer paper to cutsie it up a bit.


Let me know if you make one, I'd love to see it!
God Bless and have a great day!
Ramsey
Linking to:
Make it Monday at Cottage Instincts

Saturday, January 16, 2010

Fondue Friday

What better treat for a Friday night than a little PJ fondue party???

First order of business was to hit up the local pizzaria for a "fancy shmancy" dinner (aka: pizza and the world's BEST garlic knots). Of course we all behaved like very mature grown-ups.
Aren't my sister and her boyfriend cute! They look like they could be twins.


Our family has very serious rules about playing with your food.


Can you tell I was behind the camera??? My sneaks made it into one picture.

Here is a little peek at our dippers to make your mouth water.

Bananas, strawberrys and rice krispy treats of course!

I made oreo-covered marshmallows (I was trying to copy the Melting Pot). AMAZING!!! You have to try these! Just smush up some oreos in a plastic bag until they are all crushed up, dip the marshmallows in melted butter, and give 'em a little roll in the oreo crumbs. YUM!!!
Note the awesome retro fondue pot. We melted milk chocolate chips along with Heath bar bits for some yummy dipping. (Ignore the mess in the background, I didn't exactly have time to set up a proper photo shoot before we dove in like wild beasts.)

No one would let me get a picture of them in their PJs, plus we were all so busy stuffing our faces that I kinda forgot.
Hope you enjoyed, now go make some fondue!!! Have a great rest of the weekend!
Love,
Ramsey

Wednesday, January 13, 2010

Ruffle Booty Onsie

So, I just found out that a friend of mine, who is due in June, is having a little girl!!! YAY!!! You know what that means.....I get to make lots of adorable little girly things! Here is project #1: Ruffle Booty Onsie. I'm sure you've seen these around the blogosphere but I will share my variation with you. It is so easy and so cute! I also added a cute little saying to the front of mine using iron-on transfer paper. Ok, enough chit-chat....down to business. You will need a plain white onsie.
This is awesome because it uses up those scrap pieces that you fabric hoarders have packed away. Cut three pieces of fabric that are about twice as wide as you want the finished ruffles to be and twice as long as your onsie. Iron the outside ends in, toward the wrong side of fabric (see picture) and iron the fabric in half with right sides facing.
Sew a seam long-ways (I don't think that is a word, but you know what I mean) down the fabric strip.

Use a safety pin to turn the "tube" inside out. Pin it to one end of the strip and feed it through the middle, continuing until the pin comes out the other end and the tube is right-side out.


Once it's right-side out, iron the strip flat. Sew a basting stitch down the center so that you can form the ruffles. I sewed a basting stitch by hand and all you really have to do is thread your needle in and out using even stitches.


Use the width of the back of your onsie to judge the width you need the ruffle to be and tie off the end.


Pin the ruffle to the onsie (I was paranoid my ruffles would slip, so I got a little pin happy.) Once it's pinned in place, sew a seam down the middle over your basting stitch with a sewing machine. I have a tendency to get overly excited and go too fast, don't do that...go slowly.


You know that song, Henry the 8th...2nd verse, same as the first...cricket cricket... ok, well this is the same concept. The second ruffle works the same as the first. Repeat once more for the third ruffle. This is seriously easy and quite quick.


And as if this wasn't cute enought to scarf up already, I added an adorable little saying to the front. I think it really amped up the cute factor, don't you? I have a tutorial on how to make iron-on transfers for tote bags here if you've never done it before, but its super easy.

Cutie Patootie!!! Can't wait to see it on a precious little one!

Love to you guys,
Ramsey
Linking to:

DIY Day @ ASPTL